A set of glute exercises with resistance bands can help you build strength, support your hips and knees, and make everyday movement feel easier. You can do them at home, in the gym, or while traveling, and you do not need heavy weights or big machines to see progress.
Below, you will learn how resistance bands work for your glutes, how to choose and place them, and a simple workout you can start today.
Understand why resistance bands grow glutes
Resistance bands, often called booty bands, glute bands, butt bands, or hip bands, give your muscles something to push or pull against as you move. Instead of relying on gravity like dumbbells or barbells, bands provide resistance through elastic tension.
When you do glute exercises with resistance bands, you mainly target three muscles:
- Gluteus maximus, which extends and rotates your thigh and powers movements like hip thrusts and sprints
- Gluteus medius, which stabilizes your pelvis and controls side-to-side hip motion
- Gluteus minimus, which works with the medius to support your hip and keep your pelvis level when you walk or run
Research suggests that elastic resistance can build strength at levels similar to traditional weights, as long as you use enough tension and work close to muscular fatigue. A 2019 study found that resistance band training can deliver comparable strength gains to conventional gym equipment for major muscle groups, including the glutes.
Because bands keep your muscles under nearly constant tension, they are especially useful for muscle growth. A 2012 paper in the Journal of Physiology highlighted that time under tension, not just the amount of weight, plays a key role in hypertrophy. This means slow, controlled band work can effectively stimulate your glutes even if the resistance feels lighter than a barbell.
Learn the benefits for your body
Stronger glutes do more than change how your jeans fit. They support your entire lower body and spine.
Support posture and reduce pain
When you sit for long periods, your hip flexors tighten and your glutes tend to switch off. Over time, that can lead to tight hips, an overworked lower back, and even discomfort around your knees or ankles.
Glute-focused resistance band training helps you:
- Offset hours of sitting by actively engaging your hip extensors
- Improve pelvic alignment, which can ease strain on your lumbar spine
- Stabilize your knees so they track properly during walking, running, and squats
Experts note that consistent glute strengthening can reduce knee and low back pain that is often linked with weak glutes and poor pelvic control. You may notice simple things like climbing stairs, getting up from a chair, or walking uphill feel smoother once your glutes are doing their share of the work.
Boost power and athletic performance
Strong glutes drive explosive movements. Studies have shown that athletes who warm up with targeted glute exercises improve their jump performance compared with those who skip glute activation. Adding band work to your routine can help you:
- Run faster by contributing more hip extension in each stride
- Jump higher by producing more force through your hips
- Change direction more easily, thanks to better hip and pelvic stability
Because bands are joint friendly and low impact, you can use them before high intensity workouts to increase blood flow and muscle activation without tiring yourself out.
Think of resistance bands as a warm up, a workout, and a rehab tool all in one compact piece of equipment.
Choose the right resistance bands
Not all bands feel the same, and the style you pick will shape how comfortable and effective your glute exercises are.
Mini loop vs long unlooped bands
For glute-specific training, mini loop bands are often the easiest place to start. These short loops usually sit around your thighs just above the knees and create outward tension for moves like squats, bridges, and lateral walks. You can also slide them down to your shins or ankles for more challenge and more demand on the gluteus medius.
Long unlooped bands are more versatile. You can tie them into a loop for glute work or leave them long to mimic cable machine exercises, such as standing kickbacks or pull throughs. Smart resistance band systems like LIT Axis are designed to imitate cable stacks for home use and can be helpful if you want a more gym like experience without large machines.
Both styles can build your glutes. You can start with mini loops for simplicity, then add a long band as you experiment with more variations.
How heavy should your band be
With bands, heavier is not always better. If the band is too tight, your body may recruit other muscles to help, especially the tensor fasciae latae (TFL) on the outer hip. This compensation can show up as tightness or discomfort along the outer thigh instead of a burn in your glutes.
Choose a resistance level that lets you:
- Move through a full range of motion
- Keep your knees aligned over your toes
- Feel your glutes doing the work, not your lower back or outer hip
If you notice your form breaking down or your TFL taking over, drop to a lighter band. You will usually get more glute growth from perfect reps with moderate resistance than from grinding through sloppy reps with a band that is too heavy.
Place your bands for maximum glute activation
Correct band placement can turn an average exercise into a highly targeted glute move.
For most lower body glute exercises, you will get the best results by placing the band:
- Just above the kneecaps, or
- At mid thigh level
These positions create side to side tension that encourages your glutes, especially the medius, to fire and keep your knees from caving in.
If you want more intensity, you can slide the band just below your knees. The lower placement slightly lengthens the lever arm, which increases the challenge and deepens muscle activation. Around the ankles or shins will also raise difficulty in exercises like lateral band walks, but you will need to pay extra attention to knee alignment.
Avoid automatically wrapping a booty band around your knees for every exercise, especially major compound lifts like hip thrusts, leg press, and Romanian deadlifts. When you add lateral band tension to movements that already have vertical resistance from weights, you change the mechanics and often make it harder to load the glute maximus effectively.
Coaches have observed that using bands in this way can:
- Shift work to smaller stabilizing muscles instead of the big glute max
- Limit the weight you can lift, which reduces long term growth potential
- Make the movement feel harder without truly challenging the target muscle
Use bands intentionally, not by default. Let them complement your glute training instead of interfering with your heaviest strength work.
Master technique and mind muscle connection
How you perform glute exercises with resistance bands matters just as much as which ones you choose.
Focus your attention on the glutes
Before each rep, consciously squeeze the glute on the working side, then move into the exercise. This simple mental cue helps you develop a stronger mind muscle connection, especially during isolation moves like kickbacks and clamshells.
Move slowly enough that you can feel:
- Your glute working as you push against the band during the effort phase
- Continuous tension at the top of the movement, where the muscle is shortest
- Control during the return phase, rather than letting the band snap you back
This controlled style increases your time under tension, which, as the Journal of Physiology research suggests, is a key trigger for hypertrophy.
Protect your lower back
A few alignment tips will keep your glute work from turning into a low back workout:
- Draw your lower ribs gently toward your hips to avoid arching your spine
- Keep your core lightly engaged, as if you are bracing for a gentle poke
- In bridges and squats, drive through your heels and keep your shins roughly vertical when possible
If you feel most of the burn in your lower back, reset your form. Often, slightly tucking your tailbone and engaging your core solves the issue.
Try this simple resistance band glute workout
Here is a beginner friendly circuit you can do 2 to 3 times per week. Start with a light or medium mini loop band and rest 30 to 45 seconds between exercises.
Perform 10 to 12 slow, controlled reps for each move and complete 2 to 3 rounds.
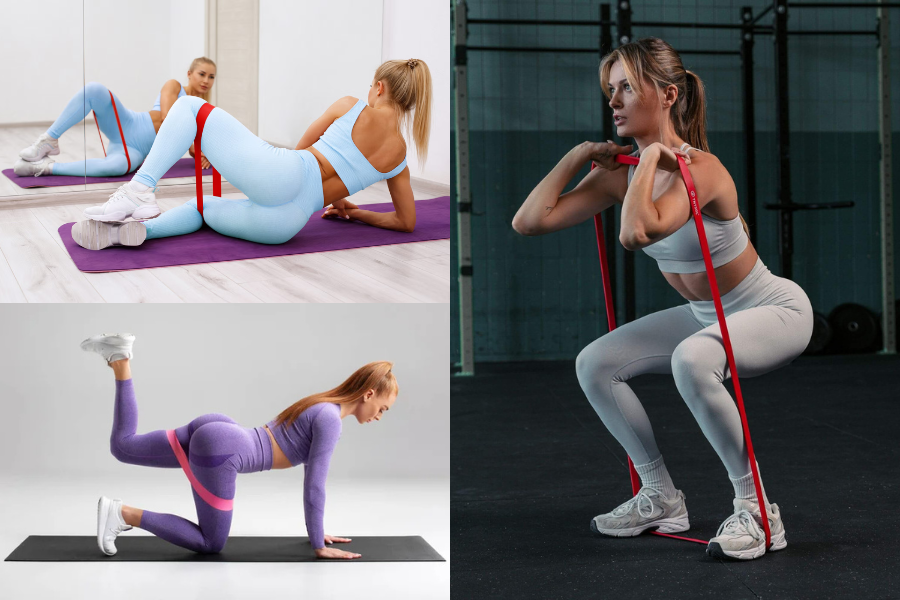
1. Lateral band walk
- Place the band around your thighs just above your knees
- Stand tall with feet hip width apart and a slight bend in your knees
- Push your knees gently out against the band and sit into a soft quarter squat
- Step sideways with your right foot, then follow with your left foot without letting the band go slack
- Keep your chest lifted and your hips level
You should feel the sides of your hips and glutes working, not your knees.
2. Squat to lateral leg lift
- Keep the band above your knees
- Stand with feet shoulder width apart
- Sit back into a squat, keeping your knees tracking over your toes
- As you stand up, shift your weight to one leg and lift the other leg straight out to the side
- Squeeze the glute on the lifting leg at the top, then lower with control and repeat on the other side
This variation trains your glute max during the squat and your glute medius during the leg lift.
3. Standing glute kickback
For this move, you can use either a mini loop or a long band anchored low behind you.
- Stand tall, holding a wall or chair for balance if needed
- Place the band around your ankles or attach one end of a long band to your working ankle
- Keep a soft bend in the standing knee and your pelvis level
- Without arching your back, kick one leg straight back, squeezing your glute at the top
- Pause briefly, then return with control until your toes tap the floor
If you feel your lower back taking over, reduce the range of motion and focus on smaller, tighter squeezes.
4. High plank leg lifts
- Place the band around your thighs above the knees
- Get into a high plank position with hands under shoulders and body in a straight line
- Keep your hips square to the floor and your core engaged
- Lift one leg a few inches, pressing the heel up toward the ceiling
- Lower with control and alternate legs
This exercise works your glutes, core, and shoulders at the same time. If a full plank is too challenging, you can drop to your knees while keeping the band on your thighs.
5. Banded glute bridge abduction
- Lie on your back with the band above your knees
- Plant your feet hip width apart, close enough that you can almost touch your heels with your fingertips
- Engage your core and press your lower back gently into the floor
- Drive through your heels to lift your hips into a bridge, forming a straight line from knees to shoulders
- At the top, push your knees outward against the band, hold for a second, then bring them back over your ankles
- Lower your hips with control and repeat
To increase difficulty over time, you can pause longer at the top, add a small weight over your hips, or progress to single leg variations without sacrificing form.
Adjust and progress your routine over time
Once this circuit feels comfortable, you can keep making progress by adjusting a few variables:
- Slow down the lowering phase to increase time under tension
- Move the band slightly lower on your legs to increase leverage and difficulty
- Add an extra set or one more exercise, such as clamshells or single leg bridges
- Introduce a heavier band while keeping the same controlled technique
You do not need a complex program or endless “Instagram exercises” to build strong, well developed glutes. A small set of glute exercises with resistance bands, done consistently and with good form, can deliver real changes in both strength and shape.
Set out your band today, pick two or three of the exercises above, and try one round. Notice where you feel the work and make small adjustments so your glutes, not your back or outer hip, take the lead. Over the next few weeks, those focused reps will add up to stronger, more dependable glutes that support you in everything you do.